
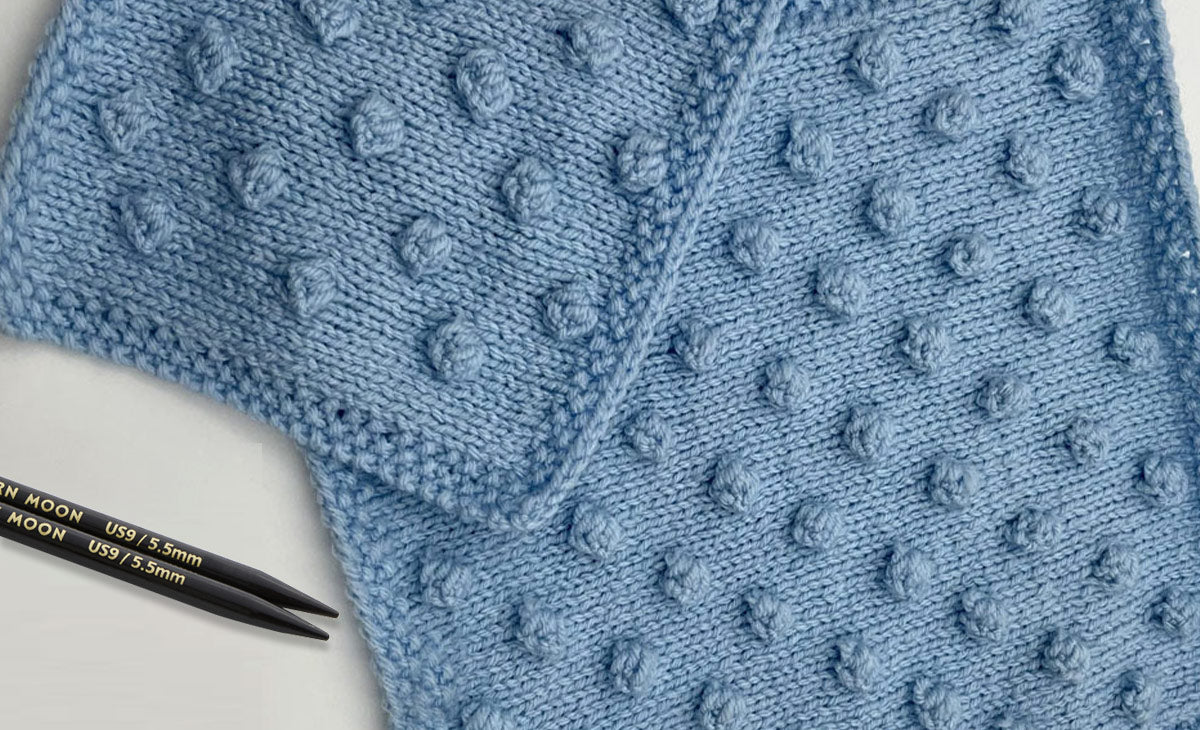
Bobbles are interesting textures that make your knitting projects special. They are 3-dimensional structures that can be knitted with your regular knitting needles. The bobble refers to a general appearance and is not a stitch but a technique. While there are many ways to work a bobble, the general steps include knitting increases, working the stitches and then decreasing the stitches. Generally, bobbles pop out beautifully on stockinette (alternating rows of knit and purl stitches) but many lace and cable patterns make use of them. The bobble stitch is not a reversible pattern as only the right side (RS) has cute yarn puffs but the wrong side (WS) looks rather plain. In this blog, we’ll walk you through the steps of knitting a bobble. The beautiful stitch pattern can be added to any sweater, hat, shawl, cowl and various other knitting projects.
Instructions to Knit Bobbles
There are many versions and variations of knitting a bobble but generally all of the methods work on the guideline of starting with one stitch. Multiple increase stitches are made in that single stitch, working the increased stitches and then decreasing all the stitches back to one.
The bobble stitch is typically abbreviated as MB in knitting patterns. As there are multiple versions of knitting bobbles, it is important to read carefully the knitting pattern. If you're designing your own pattern, you can work from any number of stitches from 3-9 given how big or puffy you want your bobble to be. You can also vary the number of times you work on the bobble for more pronounced results. Generally, you follow the same stitch pattern. For example, if you are working on a row of knit stitches, knit the bobble the same way and if you are on a row or round of purl stitches, make the bobble the same way. You can work with your regular knitting needles - single-pointed or circular needles for knitting back and forth and for knitting in the round - work with either double-pointed knitting needles (DPNs) or circular needles in the right length.
For example, let’s take a 3-stitch bobble. Take a look at the step-by-step instructions.
Row: Knitting Increase
Insert your knitting needle into the stitch where you want to place the bobble. Knit the stitch but don't pass the loop off to the left needle tip. Knit the stitch gain for an increase. You can choose to work through the front loop and then the back loop. The KFB technique is a neat and smooth knitting increase. You can KFB 3-times for three stitches.
Row: Turn around & purl across
Turn the work around and now purl the stitches you increased in the first row. You will be essentially knitting mini-short rows now. Refer to our previous blog to know how to knit short rows. Be careful to not knit additional stitches but only work the three increases.
Row: Knit
Turn the work around again and knit across the same three stitches.
Row: Purl
Again, turn the work and purl the three stitches.
Row: K3tog centered
Now is the time for knitting decreases. Turn the work around one last time. Knit the three stitches together. If you’ve worked on a decrease before such as k2tog, here you just have to k3tog. Then, continue knitting as usual.
For knitting the bobble, it is important to maintain high tension. You can also work with one needle size smaller for the bobble than the rest of the pattern for a neat and smooth texture.
Garter Stitch Bobbles
Most bobbles are worked on stockinette but you can also work them on a garter stitch pattern. The garter is a basic stitch pattern made with all rows of knit stitches but when knitting in the round, it becomes alternating rounds of knit and purl stitches. Like the stitch pattern, for knitting a bobble in the garter stitch, you simply have to knit across all rows (instead of alternating between knits and purls). The garter stitch is considerably “bumpier” and has a different gauge and the bobble will look wonderfully textured. For knitting bobbles in a garter stitch, follow these steps.
Step 1 - Work on the right side (RS). Insert your knitting needle where you would want to knit your bobble. Knit the stitch but do not move it to your right needle tip. Insert your knitting needle once again. Yarn over and knit into the same stitch again. Continue till you have 5 stitches. You have made knitting increases.
Step 2 - Turn the work. Knit the 5 stitches.
Step 3 - Turn the work so the right side is facing you.
Step 4 - Now, work a K2TOG, and knit the first two stitches together. You can also work with any other knitting decrease but k2tog is a smooth and neat technique. Place the stitch back onto the left needle tip.
Step 5 - Slip the remaining three stitches, one at a time, over the k2tog stitch and off the needle. This would work like a bind-off technique.
Step 6 - Knit the remaining stitches of the bobble and return it to the right needle.

Adding Crochet Bobbles to Your Knitting
Similar to knitting a bobble you can also work with a crochet hook. If you know how to crochet, then you have another option to add easy bobbles to your knitting without turning the project around. You simply need to work with basic crochet stitches. Crocheting a bobble is handy if you are working on a big project (like a blanket or a big shawl). Here turning your project around becomes an overwhelming task– especially if you have to do it every 3 or 5 stitches, so crochet is much more convenient.
Step 1: Insert your crochet hook where you want to place the bobble. Slip the stitch onto your crochet hook and add 3 chain stitches.
Step 2: For a 5-stitch bobble work 4 treble crochet (TR) stitches through the same stitch. To work the treble crochet stitch, take a look at our blog on basic crochet stitches. After you’ve made the stitches keep the loop on the hook. At the end of this step, you should have 5 loops on the crochet hook. You can also work on crocheting smaller bubbles by only doing double crochet stitches and only adding 3 of them.
Step 3: Crochet these 5 loops together. You can work on a crochet decrease to work the loops together. Now the bobble is made. Slip the remaining stitch to your right needle tip which you were knitting with, and continue with your pattern.
Bobbles add exciting textures to your knitting project. Enjoy your crafting with premium crochet hooks, knitting needles and accessories from the Lantern Moon collection. The exquisite ebony wood needles and hooks feature a luxurious silk finish. Enjoy a smooth knitting and crocheting experience with your handcrafted tools.