
The Garter stitch is often the first stitch pattern learned by beginners, renowned for its simplicity and ease. Ideal for your first winter project, this stitch creates a warm, textured fabric that's perfect for beautiful and warm winter projects. The beauty of the Garter stitch is, that once you master it, a whole universe of new projects and variations opens up to you.
So, grab your knitting needles, and let's unravel the secrets of the Garter stitch together!
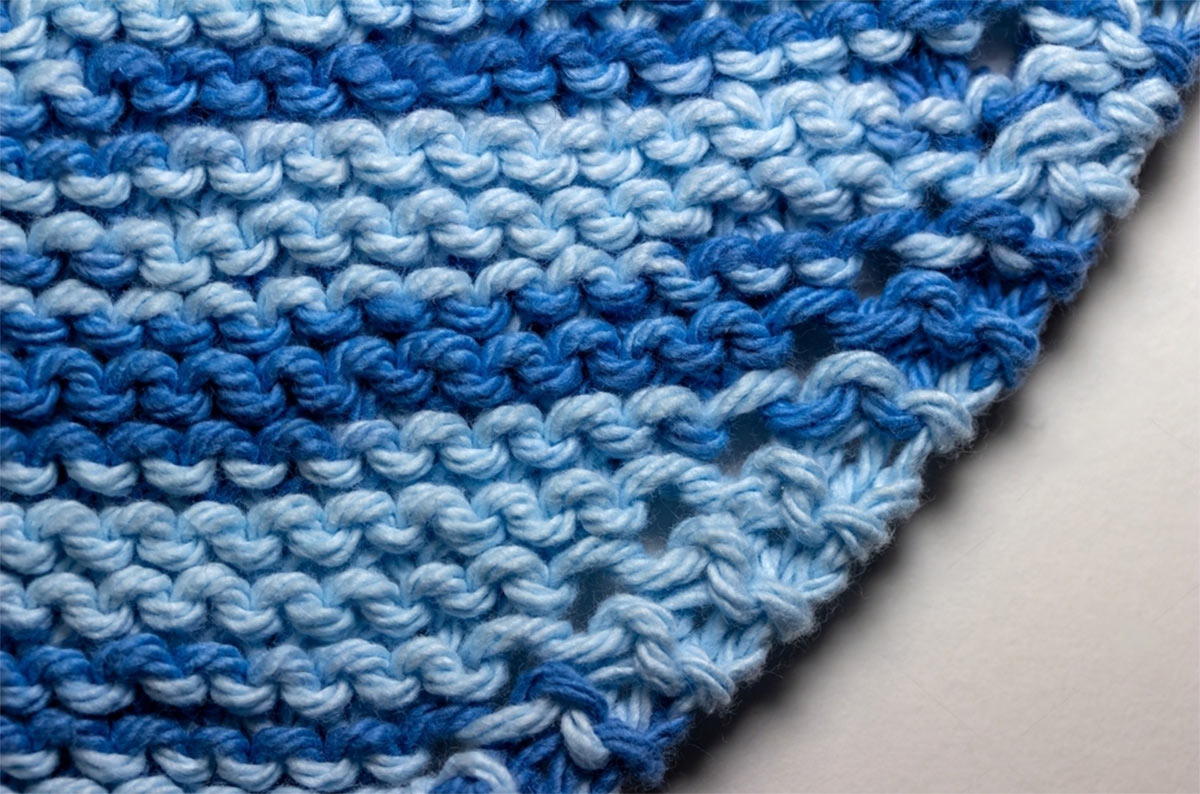
What does the Garter stitch look like?
The garter stitch is a basic knitting stitch that creates a fabric with a bumpy, textured appearance. It is one of the simplest stitches to learn on a pair of straight knitting needles, or by knitting flat on your circular knitting needles.
By the way, the name "Garter Stitch" originates from its historical use in knitting garters, i.e. elastic bands worn around the leg to hold up stockings, an everyday garment accessory before the invention of rubber bands. Over time, while the use of garters declined, the name stuck to this basic and versatile knitting stitch.
The Garter stitch looks simple yet cozy, with rows of ridges that give it a bumpy texture. This stitch is the same on both sides, making it great for projects like scarves and blankets. It's stretchy, soft, and perfect for snuggly, everyday items.

What can You Make Using the Garter Stitch Pattern?
Besides being incredibly easy to learn, the Garter stitch is also reversible, which makes it a favorite pattern for knitting scarves, where both sides of the work are often visible. But the versatility of this stitch extends far beyond scarves. It's ideal for crafting cozy blankets, warm winter hats, and snug baby booties, all of which benefit from its soft, squishy texture. The stitch's lack of curling edges makes it perfect for dishcloths, washcloths, and afghans, where a flat, stable fabric is desired. Additionally, the Garter stitch can be an excellent choice for beginner sweaters and shawls, providing a simple yet elegant texture that adds charm to any project.
Unlike many other stitches that tend to roll or curl at the edges, the Garter stitch lies flat and stable, making it an excellent choice for borders on garments like sweaters and cardigans. This quality also makes it ideal for creating neat, crisp edges on blankets and shawls, ensuring that the finished piece maintains its shape and structure. Its ability to stay flat without additional finishing or blocking saves time and effort, making it a go-to option for projects that require clean, well-defined edges.
Garter stitch in short:
- easy to learn and reversible, making it perfect for scarves where both sides are visible.
- Versatile for cozy blankets, winter hats, and baby booties, due to its soft and squishy texture.
- Thanks to non-curling edges, it is ideal for flat and stable items like dishcloths, washcloths, and afghans.
- Great for beginner projects like sweaters and shawls.
- Perfect for knitting hems and edges on garments and blankets without the need for blocking.
Skills and Materials Needed
Knitting the Garter stitch is wonderfully straightforward, requiring minimal materials and knitting accessories. At its core, all you need is a pair of straight or circular knitting needles – size dependent on your yarn choice, scissors, and a darning needle – and some yarn. Beginners may find thicker yarn and larger knitting needles, from 4.5 mm and up (US 7), easier to handle, making the stitches more visible and accessible to work with.
As for skills, the Garter stitch requires only the most fundamental of knitting techniques: the knit stitch. Additionally, you'll need to know how to cast on to begin your project and bind off to finish it.
How to Knit the Garter Stitch on Straight Knitting Needles
Step 1: Cast On
- Begin by casting on the desired number of stitches on your straight knitting needles.
Step 2: The Knit Stitch
- Once your stitches are cast on, start by knitting all stitches in the first row.
- To knit, insert the right needle from left to right into the first stitch on the left needle, wrap the yarn around the correct needle, and pull it through the stitch, sliding the old stitch off the left needle.
Step 3: Continue Knitting
- Turn your work around. Continue knitting every stitch of every row.
- This process is the same whether using straight or circular needles, as you work in rows, not rounds.
Step 4: Binding Off
- When your piece reaches the desired length, bind off all stitches to secure them.
- Cut the yarn, leaving a tail, and pull it through the last loop to finish.
Knitting Garter Stitch in The Round
For knitting the Garter stitch on circular or double pointed knitting needles, e.g. for a headband or a cowl, the process differs slightly as you create a tube and you require the skills to work both the knit and the purl stitch.
Step 1: Cast On
- Start by casting on the required number of stitches.
Step 2: Alternate Knit and Purl Rounds
- Since you’re knitting in the round, alternate between one round of knit stitches and one round of purl stitches.
- Begin with a knit round: Knit every stitch all the way around.
- Next, purl every stitch in the following round.
Step 3: Continue the Pattern
- Continue alternating between knit and purl rounds to build up the Garter stitch texture.
- This alternating creates the ridged appearance of the Garter stitch in the round.
Step 4: Binding Off
Knitting the Garter stitch is delightfully straightforward, requiring minimal materials and basic knitting skills, and is further enhanced by using high-quality tools. Lantern Moon offers a supreme knitting experience with their handcrafted straight, double-pointed, and circular knitting needles made from ebony. Whether you're a beginner venturing into knitting as a hobby or an experienced knitter looking for comfort in your craft, Lantern Moon needles provide the ideal knitting tools for creating beautiful Garter stitch projects.