
Indulge in the essence of springtime by adorning your home with handcrafted Easter decorations. Knitting and crocheting are wonderful ways to imbue your creations with a personal flair and celebrate the season's joy.
Springtime is celebrated with great enthusiasm in many cultures around the globe. In India, the Holi festival welcomes spring arrival with vibrant colors and playful water fights. It is a time to renew relationships and let go of grudges.
In Japan, the Cherry Blossom Festival - or Hanami - is a much-anticipated event where locals flock to parks to revel in the stunning beauty of cherry blossoms.
By crafting your own colorful Easter adornments, you can partake in these age-old traditions and bring a touch of cultural heritage to your home. Our blog features patterns that are beginner- to intermediate-friendly, making them easy to recreate using the exquisite ebony hooks and needles from the Lantern Moon collection.
Fair Isle-styled Easter Eggs

Gifted in many cultures and countries worldwide, decorated eggs have forever served as a commemoration of the arrival of the season and the resurgence of life.
Did you know that the tradition of Easter egg decorating can be traced back to ancient Mesopotamia? Interestingly, the tradition of the Easter bunny - a charming character associated with Easter - is a more recent invention. The bunny debuted in a 15th-century German children's story, thus popularizing the tradition of seeking hidden, vividly-colored Easter eggs.
Knitting the Fair Isle eggs is a cakewalk. They will add color and style to your Easter nest or flowering bouquet. We recommend using the handcrafted ebony double-pointed needles from Lantern Moon to make things easier. These lightweight needles not only provide a slight grip on the surface, preventing stitches from slipping off the tips, but they also allow you to handle the somewhat fiddly beginning effortlessly.
To get started, you'll need the following materials: double-pointed needles (DPNs) in sizes 2.5 or 3 mm (equivalent to US sizes 2-2.5), fingering weight yarn or sports yarn, a stitch marker to indicate the start of your pattern chart, scissors, and a darning needle.
Begin by casting on 9 stitches onto three double-pointed needles, and close the round by knitting all stitches in your first round.
For the second round, knit 2 stitches, 1 yarn over (YO), knit 1, and repeat until you have 15 stitches on your needles.
In the third round, knit all stitches and work the YO into the back of their loop to prevent gaps.
For the fourth round, knit 2 stitches, 1 YO, knit 1, and repeat - until you have 27 stitches.
Proceed to knit all stitches for the fifth to seventh rounds.
Begin your Fair Isle pattern in either the sixth or seventh round, depending on the desired size of your egg, ensuring each chart fits twice into the circumference.
In the eighth round, add 9 more evenly-distributed yarnovers between the pattern repetitions to avoid interrupting the pattern. You should now have 36 stitches in total.
For rounds nine to nineteen, knit all stitches.
In the 20th round, knit 2, knit 2 together evenly distributed between your patterns, disrupting the chart only once you have 27 stitches.
For the 21st round, knit all stitches.
In the 22nd round, knit 1, knit 2 together and repeat - until you have 19 stitches.
Knit all stitches for rounds twenty-three to twenty-five.
Finally, in the last round, knit 1 stitch, then knit all stitches together, leaving a total of 10 stitches.

Cast off all stitches, then finish the egg by snipping the thread, leaving a 20" length to crochet the loop. Stuff with filling material (e.g. yarn tails) and use a finishing needle to thread the remaining yarn through all the cast-off stitches, pulling tightly to close.
Create a slip knot with the remaining thread and use a crochet hook sized 2.5 mm or 3 mm (US: 2 or 3) to make 22 chain stitches. To secure the loop, insert the hook through the top of the egg and create a slip stitch. Finally, pull the thread through, cut it, and weave in the remaining tail to complete the loop.
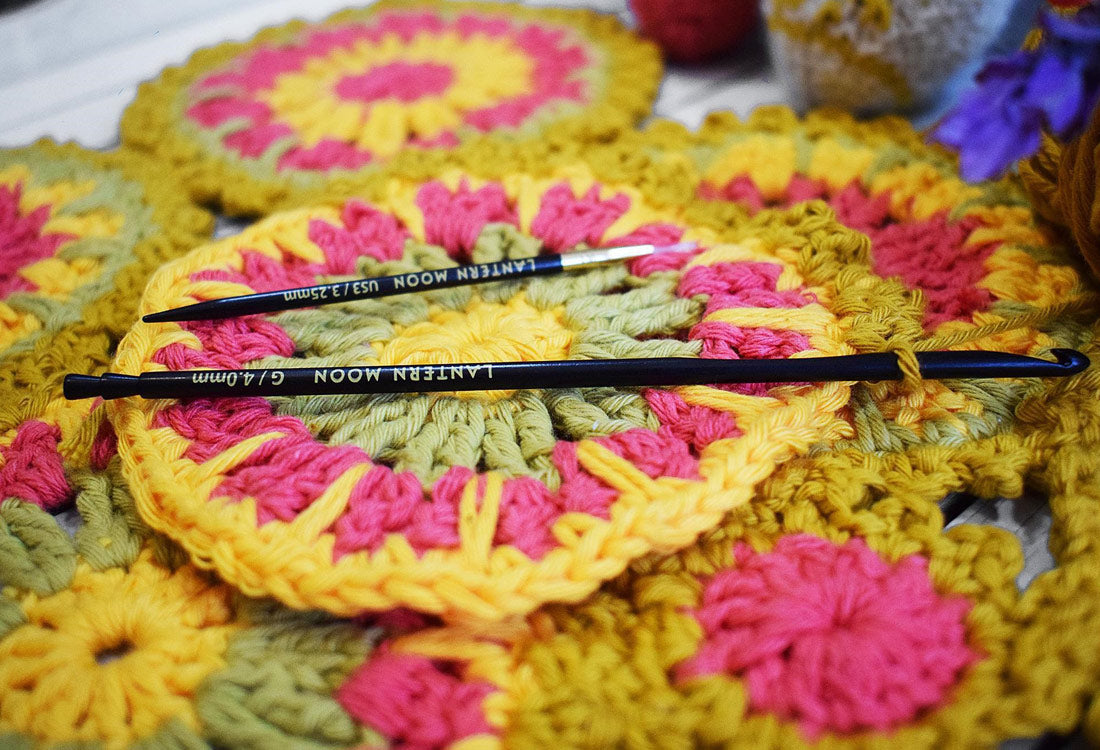
Sacred Circle Tablemats

This crochet pattern boasts a few uncomplicated techniques and stitches. Each placemat consists of six large circles in four distinct colors and two smaller circles that are sewn together to create a lovely rectangular shape of some 16 x 10.5” with each circle having a diameter of 5.5”.. These delightful mats can be easily crocheted using cotton, linen or machine-washable bamboo yarn.
To make four mats, you will require a 4 or 4.5 mm crochet hook, 100 g of cotton or linen yarn in four different hues (totaling 400 g of yarn), scissors, and a darning needle.
To begin, create a slipknot with your first color and chain 5, connecting them to a ring. Chain 2 and make 12 double crochets around your chain ring, finishing with a slip stitch in the first double crochet.
In the second round, switch to your second color and chain 4, then create one treble crochet into the same stitch and chain 1. From here crochet two treble crochets plus one chain in each stitch. Close the round with a slip stitch as before.
Change to your third color in the third round, chain 2, and make a double crochet into the same stitch. Now create two double crochets plus one chain in each stitch.
Switch again to the first color for the fourth round, chain 1 and create a single crochet into every stitch and a spike half double crochet. To do this, insert your hook into the row below and pull up the thread after every four stitches. Connect the round with a slip stitch into the first stitch.
Use your fourth color in the fifth round to create the picot edging. Chain one, then make one single crochet and three chains into every second stitch. Fasten the chain stitches into the same stitch with a slip stitch. This will create the ‘picot’. Now chain one. Repeat until the end of the round.
To craft the smaller circles in the center of the placemat, follow the guidelines for rounds 1, 2, and 5 as previously mentioned. Once all the circles have been completed, use your finishing needle to sew them together, forming a rectangle.
We hope you have relished working with the finest handcrafted tools and accessories from Lantern Moon when crafting these patterns. Remember to share your images on your social media channels and tag us @lanternmoonhandcrafted!